Wednesday, October 30, 2013

A Season of Evenings

Low Light, Flowers

Walking through town just as the light began to fade, I had one of those odd moments when everything falls into a rhythm. A woman in very high heels had just unlocked her bicycle from a pole and began rolling it down the sidewalk toward me, her shoes clicking on the bricks and the hem of her coat fluttering in the breeze. At the same time a second-story window opened and there was the late Jim Morrison's drunken baritone singing "come on now touch me baby." The sound warped a little, carried sideways by the breeze. Just then someone down the street slammed their car door and the alarm went off, a persistent beeping without that edge of harshness it would have had, had it been closer. As I stood still for some seconds, letting the woman in the heels and coat maneuver her bike around me, all of these events became harmonised. Click-click, beep-beep, what was that promise that you made? Click-click, beep-beep, why won't you tell me what she said? The woman looked up toward the open window as she passed me, and suddenly I was flooded with a sense of deja-vu.


In the Russian language there is a word - a verb - to describe the onset of evening: "vechereyet" (вечереет). It's an archaic word, but still used on occasion. The closest English translation would be something like "evening is coming," but the mood is not the same. And it's the mood of that word that's important. You hear it, and you feel an "eveningness" gently setting in. It's an anticipatory state, fostering expectations of moonlight, cricket sounds, a chill in the air, perhaps peals of laugher in the dark. I remembered this word on my way home today. The sun had nearly set and when I looked at the time I saw it was 5:35pm. "This is the last week of October," I thought. A season of early evenings awaits.

Tuesday, October 29, 2013

Bike on the T: a Mini Adventure

Sogreni, Boston MA
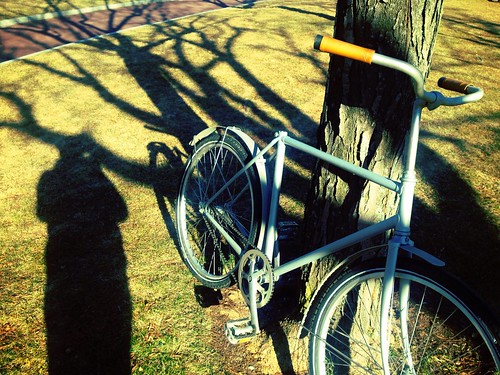
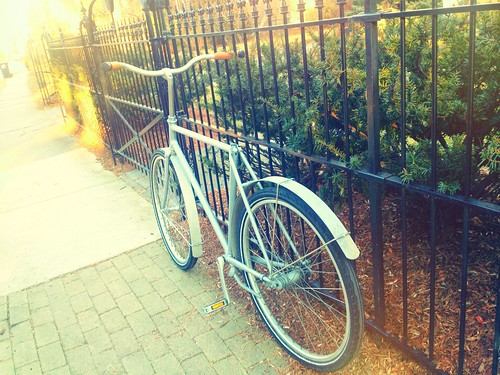
A couple of days ago I happened to visit a bike shop in downtown Boston and the owner had an interesting bicycle in the back - very unusual to see in the US. I commented on it, and he uttered this fateful reply: "Oh this thing? Take it, please!Get it out of here!" And he made me an offer I could not refuse - dared not refuse. Before I knew it, I was standing by the Boston Harbor with the bike, grinning like a madwoman at my unexpected acquisition.


But once the euphoria subsided, the reality of it hit. Missing a saddle, seatpost and front brake, the bike was not ridable and I lived 4 miles away. There was no way I was rolling it all the way home. It was time to try the dreaded "bike on the T." I had heard horror stories about it from others, but now I would find out for myself.


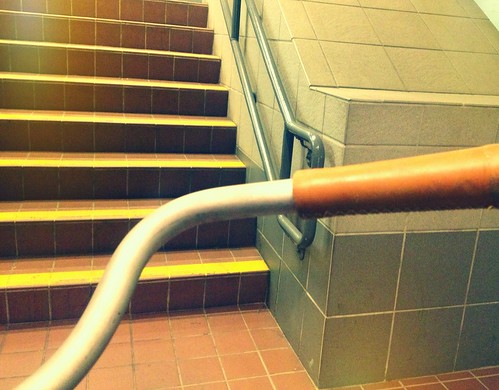
In Boston, bikes areallowed on the subwayon weekdays before 7am, between 10am and 4pm, and after 7pm. It was now 3pm, so I was just in the nick of time before the evening rush hour ban.I walked the bike to South Station and looked for an entrance that indicated the presence of an elevator. I could not find one, and rather than try every single entrance decided to carry the bike down the stairs. It was on the heavy side, but easy to hold by the top tube - overall, not too bad.


Bike on the T: Entrance
Once underground, I headed for the extra-wide handicapped entrance, slid my "Charlie card" along the electronic reader, and like magic I was in. The bike got a lot of looks from passers-by, and a couple of people asked me sympathetically whether my saddle had been stolen. The station was not too crowded, and rolling the bike along did not present any difficulties.


Red Line Elevator
Knowing that a series of staircases awaited in order to reach the platform, this time I made it a point to look for an elevator. I found one pretty quickly.


Bike on the T: Elevator
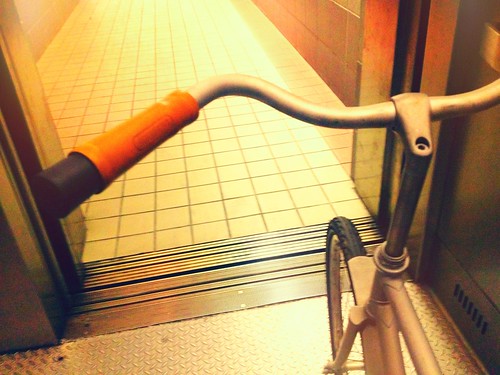
It was a roomy elevator, with plenty of space for bikes, wheelchairs and baby strollers. I pressed the button that indicated the platform I needed to get to, then disembarked when the elevator stopped at that floor.


Bike on the T: Stairs Despite Elevator
Immediately there was a sign for the platform, but then... more stairs despite having taken the elevator! It is possible that I did something wrong, but the elevator did indicate that this was the correct place to disembark. Confusing, though I was fine carrying the bike down some more stairs.


Bike on the T: Train Platform
Finally I was at the platform, waitingwith a decent-sized crowd of othersfor the train to arrive. I began to strategise: I would try to enter so as to get in the corner of the car, where I could stay close to the door and have some space. As the train pulled up, I could see that some of the cars were emptier than others, and quickly walked toward one of those.


Bike on the T: Red Line, 3pm
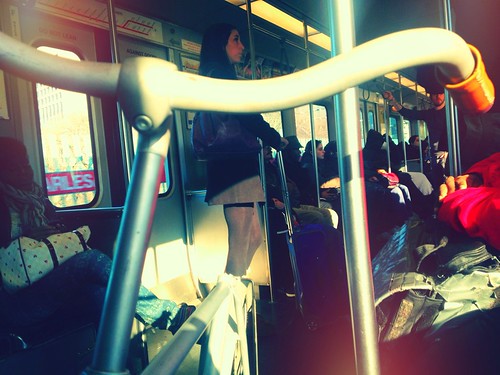
As planned, I was able to get into the corner of the car and stay close to the door. There was even an empty seat, and I positioned the bike in front of me at an angle, so that the people in the seats next to me could come and go without the bike blocking their way. The ride was bumpy, and I wedged the front wheel between my knees in addition to holding the bike, to keep it stable. The other passengers steered clear of the bike and did not bump it or brush up against it, which was nice (whenI mentioned this to the Co-Habitant later, he suggested they were probably afraid to get their clothes dirty - the bike looked filthy!). Once the train reached my station, I got up and rolled the bike backwards out of the train - not difficult as we were right by the door.


Sogreni, Cambridge MA
At the station, I decided not to even bother looking for an elevator and took the bike on a series of escalators.Then I rolled it home, which was a 12 minute walk.


Overall, I would describe my experience of taking a bike on the T in Boston as unproblematic. It is of course crucial to pay attention to the rules regarding which trains allow bikes and when, and to plan accordingly. If your bike is so heavy that you cannot carry it up and down stairs, I would also suggest looking at station maps beforehand to familiarise yourself with the locations of elevators; they are not always obvious. As the train arrives, keeping an eye on the cars and aiming for one of the emptier ones is a good idea, and looking for a spot in the corner of the car will ensure proximity to the doors. If you find that the car is getting crowded as your station nears, you could warn people that you are getting off at the next stop and will need to wheel your bike out. Other than that, I cannot really think of any additional advice.


In close to three years of cycling in Boston, this was my first time taking a bike on the subway and I am glad it went well. Now, to find a seatpost for this bike...

Monday, October 28, 2013

Upskill Style.


The very stylish Upskill Climbing team landed in Hong Kong earlier this year to streettest their new range of climbing clothing in the tough urban environment.


jjobrienclimbing was there to bring back the look.


LeeCujes momentarily considers this black on yellow knit sweater.

Co-Director Sam Cujes vetoes: No.


Brown bomber? Again: No.


After a few false starts Lee hits the gritty streets of Hong Kong in Boulders + Nuts T-Shirt from theUpskill Store. Good choice.


Get Lee's look here.


Boulders + Nuts T-Shirt protects and enhances in the dark canyons of Mong Kok

Upskill Director Lee Cujesactions an importantstyle decision in the Hong Kong officeand comes out on top in Slo PonyT-Shirt and G Star Jeans. Did you know the enigmatic Slo used to be a fashion designer?

The Upskill directors meet with principle style editors from jjobrienclimbing at Hong Kong's fabulous "Aqua"

Climbers, if yourtechnique or wardrobe need upskilling look no further.

And if you areseeking stylish traveling companions jjobrienclimbing recommends the Upskill Camp in Kalymnos this October . Travel with complete confidence that your companions won't roll out of the hotel looking shabby on you, every stylish travelers worst nightmare.

This will be the fourth in the highly successful series ofKalymnos climbing training camps for Upskill.


Have you been to Kalymnos with Upskill? Tell us about it.

Friday, October 25, 2013

What happened to the Camp Muir Webcam?

April 14,

The webcam hasn't worked since a fateful day in late November.

I have it in my office in Longmire. I went up about two months ago with all the tools to fix it, but I was unable to make field repairs, so I dismantled it and brought it down the hill.

I have been able to connect to the on-board server, but the image doesn't come up in the admin tool. I will delegate this repair to one of the climbing rangers over the next few weeks. If we can't repair or make an easy adjustment, then we'll have to order a new one.

How did it get broken? Well, reports have come in from various places, but it appears that the webcam has been consistently been taking a good beating. Not by weather, but by people, well-meaning people, to be more exact. The webcam during storms gets rimed up and it obscures the view. It may stay like this for days. So when avid viewers are actually at Camp Muir and in a position to "fix" the rime on the camera, they either hit or scrape the rime off the camera.

The marks on the camera's protective dome seem to corroborate the circumstantial evidence and the hear-say. It definitely looks like dome has taken some pretty heavy blows with a sharp object.

It will still be a month or more until I can get it working again.

Sorry for the delay.

Wordless Wednesday - Country Roads

Southern Indiana 1980. Infrared Photo digitized ...Copyright © 1980/.. by Rebeckah R. Wiseman

Tuesday, October 22, 2013

Breakwall Icicles


Icicles hang from the cable railing along the harbor breakwall in Grand Marais, MN.

Thursday, October 17, 2013

Exit ..

Followed up an excellent day of climbing in Darrington with a not-so-excellent day at Exit 38.

Started the day at Interstate with the intention of finally checking out Off Ramp. Before climbing, we figured out the approach to Off Ramp, but noticed it did not have anchors assessable for top roping. So I decided to warm up on Eating Dust as the stump no longer exists and makes Eating Rocks a bit more difficult start than it was previously. I had no issues on the climb and set up a top rope for Steen to climb. She climbed Eating Dust and then we both climbed Eating Rocks. I brought her to the top so I could finish off with Insomniac, but I balked after clipping the first bolt and could not seem to figure out the moves. My calves were noticeably sore from the previous day and after about four attempts, we decided to rap down.

On the ground we were met by Adam, Zach and his girlfriend. They were going to climb in that area while Steen and I checked out something different. We walked over to Kiss of the Crowbar a nice 5.7 route that I had climbed a few years ago with Lindsay. I started up and found it to be runout and couldn't even locate the second bolt so I went left to climb Attack of the Butter Knives before seeing the second bolt. I then made a traverse back to clip the correct bolt and then back tracked to unclip from the off route bolt.

I was then able to proceed upward. However I was still balking. Steen asked if I wanted to come down, but I told her I was going to go for it. As I clipped the third bolt I realized it suffered from the same problem the second bolt suffered from. The bolt was poorly placed and caused the carabiner on my draw to come to rest on the rock's edge. This concerned me as I was afraid of the biner breaking in a fall. The wind was blowing and I did not feel comfortable climbing upward from that point. But I noticed there might be a bypass around the next steep section by going around it to the right. I informed Steen of what I was about to do and went around to the right. After going around and up, I was a bit above the previous bolt and did not feel comfortable trying to get back on route. I then informed Steen of my decision to attempt to walk off to the right. There was a grassy ledge system with some small shrubs that I was able to traverse until I got to walking terrain. I called "off belay" and untied to walk down to Steen.

I apologized for the lack of my finishing and told her to pull the rope and told her I hoped Adam would be able to complete the route to get my gear. It was Noon, and we decided after telling the others that we would sit in the sun on the talus field and enjoy lunch. It was shady and cold near the base of the wall, and not much better on the route, so the less windy and more sunny talus slope provided a welcome change.

Adam two clips up on "...Crowbar"

After lunch Zach and his girlfriend left to go for a hike while I belayed Adam up Kiss of the Crowbar. He tried to rectify the same issue I was concerned with and did it with adding an additional biner on the bolt. He made his way surely to the top and set up a top rope for Steen and I to climb. While Steen was halfway up a guy came by that was an acquaintance who was hoping to get on the route. I told him I would skip the top rope and he could have it after Steen. Adam instructed me to head to Squishy Bell to see if I could set up a top rope there. I hiked up to Squishy Bell where there was already two parties on routes (which left only one anchor open.) Instead of being the person who holds movie theater seats when others are not in the theater, I dropped the rope and my jacket at the base and went back to pick up my pack. After explaining the situation to Adam, I headed back to wait for him and Steen to join me.


Steen cleaning the anchor on "Crowbar" with McClellan Butte backdrop.

By the time they joined me, I had convinced myself that I would lead Winter Rushing In to set up a top rope for November Glaze. Thankfully, I had no issues leading the route and set up the top rope. Steen followed Winter Rushing In and then all three of us top roped November Glaze. Which is a fun route that has a difficult move to reach the second bolt. After that route, we packed up and headed home.

This was a frustrating day for me as I climbed well the previous day but had some head issues attempting to lead today. Interestingly, I did not have those issues on the final lead, so I am not sure what happened. I guess some times you have off days, or off climbs. I'm going to put it behind me and look forward to the next climb.

Sunday, October 13, 2013

Raccoons


We did see some of the wildlife in the area while walking along the warf in Port Angeles. Of course there are raccoons in all areas of the U.S. - or so it seems, but they are kind of cute, even if an unwanted pest most of the time. This mama coon was teaching her 2 babies how to beg behind a cafe. Not a good idea but we couldn't resist taking their photos. We, also, saw several Canadan geese flying over the water.

Saturday, October 12, 2013

Clementine Pradal

Here at jjobrienclimbing we've had hundreds of letters from readers asking "When are you going to add some sophistication to your blog".

Hey, what was wrong with Big Al?............. OK, OK, I hear you.

So here's Clementine Pradal. She's French, she's stylish and she climbs in pearl earings.


Sophisticated enough?


That's Damo in the background, more from him later.


Clem works Coolm Cave's icon 26, "Screaming Insanity".

I'mconfident the stylish bloggers over at Red Phoenix Styleare going toaward Clemtheir highest approval.


Even Princess Russ never lookedthis good at the Cave.


Clem grew up climbing real mountains (in the French Pyrenees) with her family. Before she could walk she would climb mountains.


Two years ago she climbed 22's and hated anything and everything steep. Now she loves steep routes, enjoys falling (sometimes!), secretly hates slabs and climb's mid-20's.


Oo, nice chalk bag jj


All that stylish climbing can wear a girl out.


Baby Blues


I only snuck a quick peek, only took one picture.

By the time I realized the shot was not exactly in focus, and tried for another, the baby bluebirds had already fledged.


Their father, keeping an eye on the nest.

Wednesday, October 9, 2013

Joshua Tree National Park

It was on March 17th that I arrived at Joshua Tree National Park in Southern California, seeking some warmer weather. I wasn't disappointed though a few of the nights were a bit on the chilly side. Coming in on the southern side off of Interstate 10, east of Indio, I entered the park just as the visitor center was closing. The Cottonwood Spring Campground was just down the road a ways and it was there that I spent the night.

The next morning I stopped at the visitor center to get a map of the park and information on some of the trails. Half a mile from the campground was the trail to Cottonwood Spring. It was an easy walk along a gravely path and dry sandy stream. Arriving at the stream, there was simply a sign identifying the place where the Spring had been. Rather anti-climatic but it was a nice walk; the sun was shining and there was a nice breeze.

There were several other trails in the area but the southern part of the park, to me at least, wasn't all that interesting. So I hit the road and headed north where the Joshua Trees and the Jumbo Rocks were located.

Along the way there were a few things to see – the Cholla Garden and Ocotillo Forest.

The Cholla Garden was planted by Mother Nature. You do see the Cholla in other areas of the park but usually just a few hanging out together. Here in the garden they grow in abundance.

The cholla also have incredibly sharp, hooked needles that are difficult and painful to extract if you happen to get one stuck on you. I was very, very careful walking through that garden!

The Ocotillo are interesting also. They can get quite tall, this one was about 15 feet high. Much of the year it looks like a bunch of spiny dead sticks. But after it rains, the Ocotillo is covered with very small leaves. Like other deciduous trees, the Ocotillo loses it's leaves but not due to the changes in the season. Rather, for the Ocotillo, the leaves fall when there is no water. The long stems are often used for fencing material and for walking sticks.

The bright red flowers of the Ocotillo appear on the tips of the stems in spring and summer.

A “tube” of Ocotillo flowers.

Tuesday, October 8, 2013

We love new gear.


The very wise marketing team at Wild Country (UK) wereconcerned about me climbing on French made gear. Not safety, style.They are so style conscious, the Brits.So they chose this stunning outfit for me.The Wild Country Ultralite Elite harness.And they racked it up, left and right, with their latest and totally techno-fabulousHelium quickdraws.


Climbers, you know I'm not that fussy about harnesses and quickdraws, I've used a lot of junk in my time and I never blame my gear,but when I took this lotfor a burl today I felt like I was using the best.Good gear matters.


The Helium Quickdraws areabsolutely superb. They are lighter than anything I've used before.The dogbones are fat, the way I like them, andthe wire gate secures in an ingenious recessed fashion, no doubt made possible by tricky new manufacturing techniques.And how good do they look?


The first matching set of quickdraws I ever bought were Wild Country, and I fondled them all the way home in the car from Brisbane.

I don't know what a quickdraw will look like in 10 years, but for now this is as good as it gets.Thanks Wild Country, thanks Steve Foster.

Gushing, I know.But don't tell me you guyshaven't slept with your new gear beside your bed.


Good night.

jj


Heavy Snowfall

Sub-freezing temperatures and heavy snowfall dominate the mountain and complicate the flood recovery. Since Tuesday the 21st, over 77" of new snow has fallen at Paradise; as of Sunday the 26th, there was 71" on the ground (note the compaction). In Longmire, we measured 7" of new today for a total of 26" on the ground and it's still November! Winter has arrived, in full force.

I added a new blog, Flood Photos and More, to address the importance of the event and recovery. At this stage, I haven't been able to organize it, but in the next few days there will be more images and narratives. Stay tuned...

In the meantime, I appreciate your emails and thoughts. Sally Johnson sent this photo (taken last Fall) to say that she misses Paradise, especially during the first few snowstorms that blanket the meadows and trees. But Sally is not the only one lamenting the lack of access. A few of you have even posed some interesting questions in hopes (I think) of getting back on the mountain. So to be clear, we don't need backcountry skiers to test the snow stability near Paradise. Yes, I understand that ski-compacting fresh powder might reduce the avalanche hazard.

Sunday, October 6, 2013

Dynamo Lighting Kit for Roadbikes

Temp Dynamo Solution: Cyo Headlight Mounts on Brake

While I am generally a huge fan of dynamo lighting, I do not have it installed on what is currently my only roadbike. My plans for the bike did not involve significant amounts of night-time cycling; it was not meant to be a touring or randonneuring bike. For occasional riding in the dark I do have an excellent rechargeable battery headlight that lasts for hours and attaches easily to the handlebars. And I have an equally good tail light that attaches to the back of my saddle wedge tool bag. To install a dynamo hub wheel and lights on this bike would have added unnecessary weight and expense to the build.


I felt pretty good about my bike's lighting setup until I found myself wanting to join an overnight ride. Initially I thought that my super duper rechargeable battery headlight would last through the night. But when I did the math it became clear that it would not; I would need to add a second headlight and to bring several sets of spare batteries. Even at the height of summer an overnight ride in New England means 8+ hours of riding in the dark - and not the kind of milky suburban dark where you can leave the light on a low setting to conserve battery life; proper boonies dark that requires a powerful headbeam. I talked to the others doing the ride, and they all had dynamo lights. Now I felt foolish for not having a bike with appropriate lighting. But at the same time, how often would I do rides like this?


Temp Dynamo Solution: Loaner SON Hub Wheel

I was discussing this with local cyclist Pamela Blalock and she offered to lend me her mobile dynamo setup: a spare front wheel with a dynamo hub, and lights that are easy to attach and remove. With this kit, she can turn any 700C wheeled roadbike into an overnight bike. Extremely grateful to Pamela for the offer, frankly I was also skeptical that it would work out. To me, dynamo lighting was something that gets permanently installed - not attached and removed on a case by case basis! Furthermore, my bike has no fenders, no racks, no braze-ons. Could the lights be attached securely? I was worried that the installation process would be tricky, and that in the end something would end up falling off, disconnecting, or malfunctioning.


To my amazement, the installation process took mere minutes. The front wheel switch was seamless and soon my bike was sporting a dynamo hub. Then the headlight was attached to the brake bolt, as shown in the first picture. A thin cable runs straight down from the headlight to the hub, easily secured to the fork with a piece of tape.


Temp Dynamo Solution: Pixeo Tail Light on Stay via P-Clamp

For the tail light, a P-clamp was installed on the left chainstay. The wiring got routed along the chainstay and the top tube, secured with zip ties to the brake cable. The result was not beautiful, but neither was it flimsy. It was secure and problem-free. The positioning of the headlight and tail light beams were spot on.


Later I learned that other local cyclists employ a similar system for when they ride in the dark - a dynamo hub wheel and lights that get moved from bike to bike as needed. I would not have thought this to be a good idea until I tried it myself and experienced how easy and hassle-free it was. On a dedicated randonneuring or touring bike, it makes sense to have dynamo lighting permanently installed in a more elegant manner. But for those who want the option of using their pared-down roadbike for occasional night time riding, a kit like this can be a good solution. Pamela's setup includes a 32 spoke Velocity Aerohead wheel built around a Schmidt SON hub, a Lumotec Cyo IQ headlight and a Spanniga Pixeo tail light - though many alternatives exist.


At least here in New England, there seems to be an increasing amount of cross-over between road racing, randonneuring, endurance events, and casual long distance rides. And this cross-over is influencing how roadbikes are defined and equipped.I am still unsure what kind of cycling I will ultimately gravitate toward. But if more night time rides are in my future, a versatile dynamo setup like this is certainly worth considering.

Saturday, October 5, 2013

Floor Pumps: What's Your Favourite?

Lezyne Bicycle Pumps

Occasionally I will hear from readers who are having trouble pumping their own tires, and inevitably the cause ends up being their bicycle pump. Sometimes it is simply a matter of the pump not accommodating their bicycle's valve system and the new cyclist not realising this. Other times, the pump's chuck (the part that fits onto the valve) is difficult to get on and off without causing damage.There are also those who lacksufficient upper body strength to operate their pump effectively.


As someone who can pump my own tires despite poor upper body strength and poor dexterity, one thing I can say is that the pump matters a great deal. It surprises me how many cyclist initially plan to get by with just the hand-held pump they bought for their tool bag. Floor pumps are much easier to use than hand-held pumps, requiring considerably less effort to operate.


But not all floor pumps are made equal. At home I use a Pedros Racing Service floor pump and have had no complaints about it over the years. However, this model is no longer in production and I've read mixed reviews about the current Pedro models. I have also tried enough floor pumps to know that some can be difficult and awkward to use. When readers ask for recommendations I am not sure what to suggest.


My general thoughts on what makes a good floor pump are that it ought to:


. be sufficiently heavy so as to remain stable in use (steel barrel),

. require a reasonable amount of force to operate,

. have an accurate pressure gauge,

. have a dual head to accommodate Presta and Schrader valves,

. have a chuck that is easy for the average person to fit and remove.


What is your favourite bicycle floor pump? Recommendations and suggestions are most welcome.